The process begins with a photograph. In the case of this painting, I found a lady sitting on a cafe corner with back light and a very interesting pose, so I made a photo of her and promised not to share it with the world. This is the photo as originally taken, and I've blurred the face. You'll probably see it in the drawing, but I do have some integrity!

Because the taking of the photo was a bit of a difficult negotiation, I did my best to frame and shoot, while capturing the features as best as I could, given that the rest of the drawing would be fairly simple to figure out even in poor light.
The first step in creating the portrait is to decide how it will be framed. For this I decide to use the 'rule of thirds' principle of composition where you divide the rectangular space of the painting in three equal sections both horizontally and vertically and place important features on the dividing lines. You can see this more clearly when I show you the cropped result with overlapping markers:

Notice how the horizontal 3rds have been neatly divided among the very dark bottom, a middle value mid section, and the back-lit top.
There are other compositional advantages that I decided to exploit as well, and which were not totally planned. There is a strong horizontal line, as well as a scarf, which both lead the eye towards the face. Both the face and the hands are intersected by the main diagonal. One thing I did 'plan' or noticed and which made the picture good, is that I should be able to achieve a 'mood' in this picture due to the donwcast expression, which is complimented by the back light and the fact that most dark values are grouped at the bottom.
Another happy coincidence is that my hardest edge can be easily foudn in the forehead against the back light.
Now it's time to do a quick gestural sketch to capture the pose and get a feel for it.

The purpose of a gestural sketch is to begin assessing the pose you're dealing with. In this cake I wanted to make sure I captured that slouchy lost-in-thought gesture, and see if the composition I had framed in the photo worked well when translated to paper.
Gestural sketches can help us created an exaggerated version of the pose and here's where we take artistic license. These sketches prevent our drawing from taking on a feel that is too stiff and sculptural. They are a lot of fun and they can take anywhere from 30 seconds to 10 minutes depending on how much detail we want to capture.
You will notice that the drawing is very rough and I was not too concerned with the facial features other than marking them in and making sure that the angle of the forehead to the chin was correct to capture the gesture of the head as a whole.
The next step is to make a more detailed study of the face. I'm doing this to prevent my end product to look to overworked, so that my sketching can be cleaner and more direct. It also prevents my paper from becoming worn out or irritated through too much erasing. I never trace faces, it's important to learn how to draw them just like everything else. This is something I'm very clear about during my Amsterdam drawing classes, and I emphasize it in the portrait commissions I create.
The expression of the face in this sketch will be crucial to make the artwork communicate the feeling I want it to.
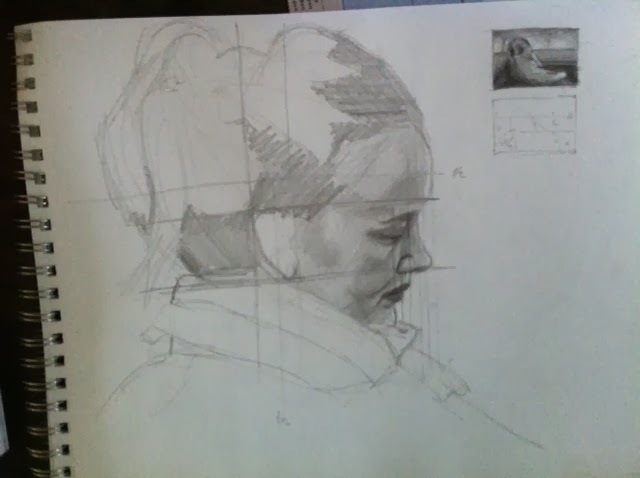
Here you see the portrait study drawing in pencil. It's not a perfect rendition but the line drawing is exactly what it should be. I say the rendition is not perfect, because first I have not spent enough time sorting out the value relationships and making this a proper drawing, and secondly, the values in this face do not correspond to the values I will use in the end result. You see for example lots of 'total white' on the face, while the final face will have 'lights' that are far darker than this. There will be no highlights on it and even the little rim light reflection on the forehead and nose will not be the lightest notes on the drawing/painting.
After I finish this portrait sketch, I trace some line markers that will help me draw the face in the next step of the process.
You will notice that the sketch drawing has a couple of little squares at the top right. A couple of words about what those are:

These are called thumbnails and they are a fantastic way to test the composition of your painting while including the tones you intend to use. The tonal structure of a painting is like it's skeleton. A painting can be both abstract or very realistic, but it needs to have an interesting tonal structure and composition if it is to succeed. Contrary to what most people think, color is not what makes a painting great. Color is the icing on the cake. The cake itself is made of a good tonal structure.
Sometimes you must create quite a few different thumbnails to play around with the tones and find a winning combination. In this case I felt the picture was already telling me what to do and only a few decisions were left. I created the first thumbnail and it felt right. The mood was there and the only real decision I'm faced with is just how light will I make those back lights. Will I go to total white or will I tone it down and make it more gloomy and dramatic?
Notice that even though the scarf and the face in the photo have lots of values, I'm trying to compress these and make a more uniform block of the whole area. I have expressed these uniform blocks of tone in the numbers thumbnail beneath. This is a toning-by-numbers reminder I'm giving myself.
This is one of the great uses of the thumbnail. It allows you to depart from the original in an attempt to achieve a stronger composition. You determine value ranges that you're allowed to use in every area of the painting and try to stick to those as much as possible. In doing that you exercise value economy, sending a much clearer message to the viewer.
At this point you may be thinking this is all overkill. That it is mental to go though all this trouble just to create a portrait commission. But all this is indeed what separates an excellent result from a mediocre one. The masterpieces we admire in museums are not the result of blind luck. These painters plotted and schemed for weeks, sometimes months, to create amazing pieces of visual art. No element left to chance: composition, light, subject, brushwork. Da Vinci apparently spent weeks scouring Venice to find the face that would be the right Judas in the Last Supper.
I used to look at all these steps, studies, etc by other painters and think to myself, "what a drag, I just want to paint and make nice art". However, as you begin to get more ambitious about the results you want, you realize the process must be broken down in stages. You have to plan ahead, creep up to the painting.
In any case, we're now ready for the next step, which is to make a fully fledged study in charcoal, on A2 format. This begins with the usual line block in, which is the stage I'm currently at in this drawing, and that you can see here:

You may think: "all that work just for this??" Well, yes. It doesn't look impressive, but remember all I've learned about this piece before getting to this stage:
- I know how I want to frame the image
- I'm making use of strong compositional principles
- I've created the face drawing in 5 minutes with my paper intact
- I'm clear about the value structure I want to use
In a way, at this stage I have my work cut out for me, which allows me to spend all my mental energy thinking of the technique I will use for laying down the tone, in view of the end result I want.
Hope this helps anyone who's curious about how to start a portrait drawing or painting and wants a result that is better than average. I will continue to work on this piece and post the progress as I go along. The plan is to finish the charcoal study and then perhaps create a color study in pastel, before finally creating an oil master.
No comments:
Post a Comment